
Before you start
Computer tools and KeySigner on iPhone
- Pair the KeySigner computer tools with the phone and add the public key to GitHub as a signing key. Use a test repository to check the signature in Git and on GitHub.
Data and access
Setup steps
Prepare a test repository
Clone a private GitHub test repository that already has a commit. On a test computer or separate user profile, pair the KeySigner desktop tools with your iPhone. Set Git’s user.email to an address verified on your test GitHub account, then preview the global signing settings.
keysigner-agent setup-gitCheck. The preview shows the current and proposed global settings and the intended test public key.
Register the signing key
Copy the full public key shown for user.signingkey after the key:: prefix. Add it to your GitHub account settings with the key type set to Signing Key. After reviewing the preview, apply the setup.
keysigner-agent setup-git --applyCheck. GitHub lists the test public key as a signing key. The applied settings match the preview.
Approve an empty test commit
Run the command from the test repository. It creates a commit without including staged changes. In KeySigner on your iPhone, compare the commit message, author and signing key with what you expect before approving.
git commit --only --allow-empty -S \
  -m "feat: signed on my phone"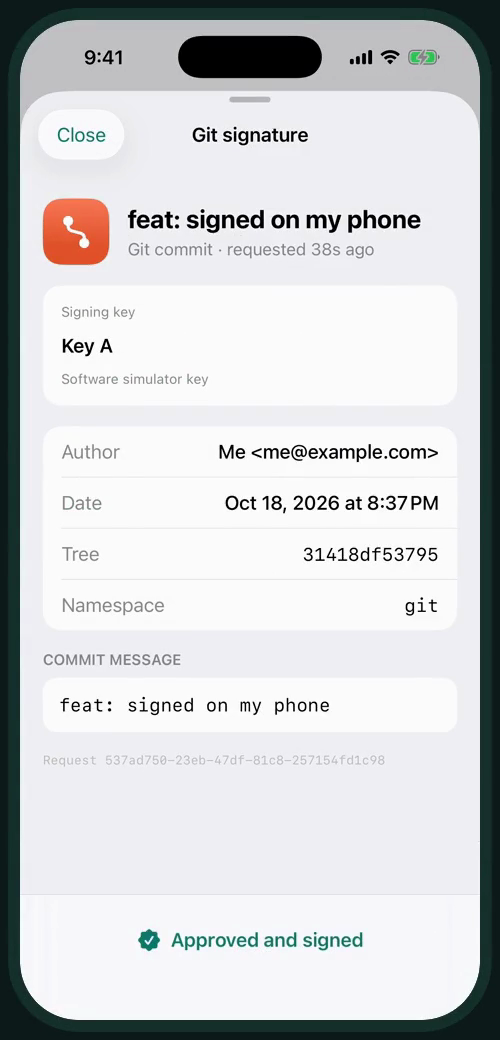
Example approval in the KeySigner iPhone simulator. View full-size screenshot Check. KeySigner shows Approved and signed for the test message. Git reports that the commit was created.
Verify the signature in Git
With the test commit still at the tip of your branch, verify its signature and record the ID printed on the final line.
git verify-commit HEAD && git rev-parse HEADCheck. Git reports a valid signature and prints the full commit ID.
Check GitHub’s Verified badge
Confirm your remote points to the private test repository and push the test branch. Open the commit on GitHub and select its Verified badge to view the signing details.
Check. Match the full commit ID to the one you recorded in Git and compare the key shown in the verification details with the key you registered.
Check your result
When you finish the test, run keysigner-agent rollback git to restore the global settings saved before setup. Remove only the test signing key from GitHub. The Verified badge records an earlier check. GitHub retains that record in the same repository and its forks after you remove the key.
If you get stuck
GitHub shows the commit as unverified
Check that you opened the same commit that passed local verification. Compare the public key in the setup preview with the signing key registered in GitHub, then check that the commit’s committer email is verified on that account.